You guys, I am SO EXCITED to be sharing (you guessed it) another pallet project! I've mentioned before that I love creating meaningful and inexpensive art and what better way to do that then with pallets. My son is obsessed with all things trucks and tractors, so it was a no brainer to create custom truck art for his room.
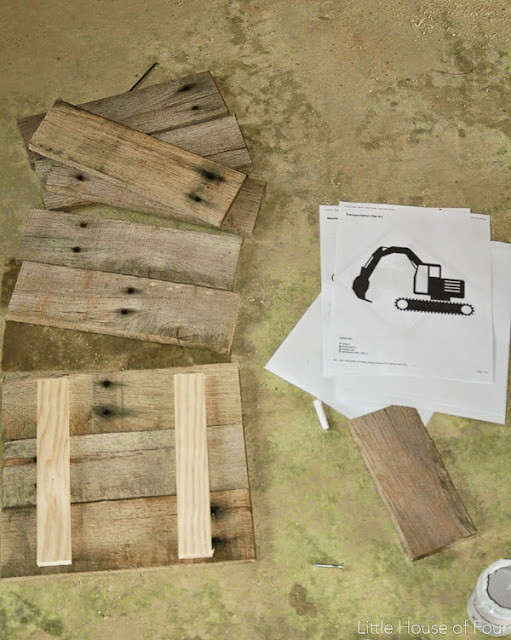
I started by cutting the pallet boards down into 9 equal pieces. Then, cut 6, 1x1/2 inch boards into smaller pieces to attach to the pallets.
Before nailing, I applied a fair amount of wood glue to the 1x1/2 inch boards then nailed them into the pallet boards.
After the boards were nailed together, I white washed them by mixing equal parts paint and water.
I let the paint dry then it was time for the fun part! I printed three silhouette pictures that I knew my son would love. I trimmed the pictures down then applied a decent amount of Mod Podge to the front of each picture.
I laid the pictures face down onto the pallets then pressed firmly and smoothed them out. Once the Mod Podge was almost completely dry, I wet a rag and dampened the pictures slightly and peeled off the paper.
Some of the white paper will be left on the board, but you can easily remove it by rubbing it off gently with a wet rag.
This method was perfect for the rustic look I was going for and my son absolutely LOVES them! He had no idea I was making them and was so excited when I told him I had a surprise for him in his room.
Three custom pictures that were absolutely free and made my son smile. I'd say it was a successful project!
Just in case you need more pallet inspiration, here's 20 more fabulous ideas!


I bet your son was so excited!These are so cute! I can think of all sorts of signs to make with this method! I'll have to give it a try!
ReplyDeleteIt works on leather or most porous material I put my dads old 69 Cadiz on my wallet
DeleteSeriously cool Katie!!! I can think of a zillion places to put something like this in my home! BRILLIANT!!!
ReplyDeleteUm these are AMAZING! I can't wait to try this method!!
ReplyDeleteWhat an awesome idea & so easy too! Going to have to think of something to print and transfer for my son's room!
ReplyDeleteKatie, these are super cute. I want to try one with an airplane for my son's room. Love all of your pallet projects!
ReplyDeleteEmily @ elizabethjoandesigns.com
These look great, Katie! I love the rustic look :) Would love for you to come share any of your fabulous projects at our Thurs. link party again please. Hope your week is great!
ReplyDeleteKendra @ www.joyinourhome.com
This is a really cool project! They look great.
ReplyDeleteI love how easy the transfer was! Those pictures are so cute and I just love the rustic look!!
ReplyDeleteAw, these are awesome! My little guy would flip for these in his room! Great job, Katie!
ReplyDeletesooo cute! I totally want to do this in my nursery! Thanks for linking up to Outside the Box
ReplyDeleteI love your art. I found your lovely blog on Think and Make Thursday link party.
ReplyDeleteI'm glad you liked them Vanessa! Thanks so much for stopping by :)
DeleteThis is genius, Katie! Such a cute idea for a boy's room, too! And I totally feel ya on breaking pallets down. Such a PITA!
ReplyDeleteYou come up with such great ideas for those pallets! These pieces of art remind of something that would come out of the Pottery Barn catalog. They are perfect for a little boy's room, yet still have the look of the rustic worn wood that we all love in our decorating. Fabulous!
ReplyDeleteStopping by from Off the hook Monday link party. Love these! Love the rustic look, my son would love these too:)
ReplyDeleteWHAT AN AMAZING IDEA! (yes, bigger letters, cause I am screaming!)
ReplyDeleteI love it! Have to try this! Thanks :)
These are SO cute and very creative. I can imagine your son was excited because they look great in his room. I saw your link at That DIY Party. Ann Marie @ Iris Abbey
ReplyDeleteI love these! I just tried this method for the first time last week. Mine kept bleeding, I think I was using too much water lol. I am going to try it again with the mod podge too..Thanks for linking up this week to Totally Terrific Tuesday Link Party!! Remember party starts again monday at 10pm to see who was picked for features and link up new content!
ReplyDeleteIf you follow me on Google+ I send out a reminder, and I try to follow everyone back that adds me :)
There were so many inspiring links this week, hope you found a few that inspired you as well!
Thanks again
Jessica http://www.liverandomlysimple.com
JBArts, my daughter just made something similar. She said you have to use a Laser Printer to make this work. The InkJet will not adhere to the boards. She ran to office depot and had hers printed for very little money!
Deletethe pictures, are they printed on wax paper?? that they would transfer like that? thanks....roxane
ReplyDeleteHave you tried this with color? I tried it but rubbed off the color trying to get the paper off. Any suggestions?
ReplyDeleteWhat type of nails do u use?
ReplyDelete