It's the second Wednesday of the month, which means it's time for another Monthly DIY Challenge!
Each month a bunch of my blogger friends and I join together for a challenge featuring a particular product or theme. This month's product was Sharpie, which I used to update a traditional Schoolhouse light into something more suitable for my office.
Let's back up a minute.
A long time ago I stumbled across a gorgeous Schoolhouse light that I just had to have.
I wasn't sure where it was going to go in our home, but I knew I wanted one. Being the cheap thrifty shopper that I am, I decided to wait until A. it went on sale or B. I knew exactly where I wanted it to go.
Fast forward a few months.
I go to buy the light and IT'S NO LONGER AVAILABLE!!!
That left only one choice, DIY my own version.
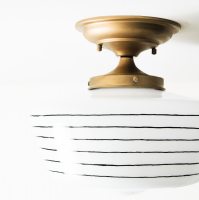
I ended up buying an inexpensive Schoolhouse light from Home Depot and updating it with the help of spray paint, Gold Leaf Rub 'N Buff and Sharpie Markers.
SUPPLIES NEEDED TO UPDATE A BASIC
SCHOOLHOUSE LIGHT
Affiliate links have been used.
- Schoolhouse Light ($39.97 at Home Depot)
-Black Sharpie marker
-Gold Spray Paint
-Large Rubber Bands
HOW TO UPDATE A BASIC SCHOOLHOUSE LIGHT
After I bought my light from Home Depot I headed out to Hobby Lobby to pick up my Sharpies. I ended up getting both regular black permanent markers and a couple oil based paint markers. If you are familiar with Sharpies then you know the black markers have a purple hue to them. I was hoping the oil paint sharpie would give me better coverage and a more richer black color.
I wrapped large rubber bands around the globe to use as a guide to make my lines. I found this is to be the best way to get the straightest lines. If you are dead set on clean, crisp lines do not attempt this project. I found it nearly impossible to get perfect lines.I used the regular sharpie to draw the black lines, working down my globe.
After completing all the black stripes I went over each one with an oil based marker.
Here's where I used a bit of trial and error. I have quite a stash of gold spray paint, but wasn't sure which one to use. I started with Valspar metallic gold, but wasn't thrilled with the results.
Next I tried Rust-oleum pure gold, but it didn't give me the color I was looking for either.
I ended up breaking out my Gold Leaf Rub 'N Buff and applied two coats over top the spray paint. The brushed gold was exactly what I was looking for.
Now, don't forget to check out the rest of the amazing Sharpie projects.




Such a better option to DIY your own! The rubber bands are a genius idea. Love how it turned out!
ReplyDeleteThis turned out beautifully! I know you had some struggles along the way but it was totally worth it in the end. Love the idea of using rubber bands for straighter lines!!
ReplyDeleteThis is incredible!! Love it so much.
ReplyDeleteYour light is super cute! It's perfect in your office, too. Glad you got the look for less! :-)
ReplyDeleteLove it, Katie! Such a creative idea!
ReplyDelete