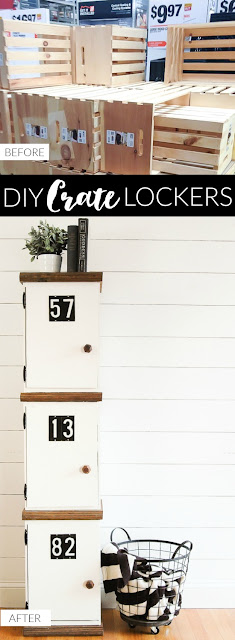
Learn how to build a simple DIY locker using basic tools and materials!
This post is sponsored by Crates and Pallet. As always, all opinions are my own. You can read more about the feature of this project in Better Homes and Gardens HERE.
I've been searching for a set of lockers for months and months with no luck. Unfortunately, the lockers I have found are either the wrong size, too damaged or not the right style. I'm still keeping my eye out for the perfect set (Update: I eventually did find amazing lockers for my office), but until then, I decided to build my own DIY lockers using 3 large Crates and Pallet crates.
-SUPPLIES NEEDED TO BUILD DIY LOCKERS-
Affiliate links have been used.
- 3 large Crates and Pallet crates
- 2x6' 1/4 plywood (I used a chalkboard sheet since I had one on hand)
- 2 x 10 x 6 (I used a scrap piece of wood that was already stained and was a bit wider)
- 1 x 1/4 x 6 (you only need about a foot)
- 2 small clamps
- Paintbrush (Purdy is my favorite)
- Minwax expresso stain
- White paint
- 1 1/4" screws
- 3 magnetic latches
- 6 cabinet hinges
- 3 door pulls (I got mine from hobby lobby)
- 6 aluminum reflective numbers
- Silver decorative brads
- Drill with various drill bits
- DAP wood glue
-CUT LIST-
- 3 Doors- 11 3/4" x 16 1/2"
- Stained Wood (for center accents) 13 1/2" x 10" (mine were a bit wider since I used wood I had on hand)
- Interior shelves 11 3/4" x 6 /4"
- (12) 1/2" pieces for shelf supports
HOW TO BUILD DIY CRATE LOCKERS
I headed to Home Depot and picked up 3 Crates and Pallet crates. Right now they are a special buy and you can snag them for only $9.97 a piece! I also picked up the rest of the supplies that I needed to build the crate lockers.

First, I cut all my wood then painted two coats of white paint on each crate and the front and back of each door panel.
Once the paint was dry it was time to assemble the lockers!
I used 4 screws to attach the stained support piece to each end of the crates, working my way up until I had all 3 crates attached.
After I had the lockers assembled I moved onto attaching the doors. Since I chose to use thin wood I attached the hinges to the crates with the screws provided but opted to use wood glue to attach the hinges to the door. Small clamps held everything together until the glue was dry.
Once the doors were attached I added aluminum numbers (pre drill holes, attach with glue then add decorative brads), wood knobs and magnetic door latches. Again, I used glue for the door latches to avoid exposed screws.

I glued the small shelf supports (5 inches down from the top) to each crate then painted them white.
Once the shelf supports were dry I added the shelves and called this project complete!
I love how the crate lockers turned out and can't wait to find a home for them somewhere in my house. My 6 year old son is begging for them to go in his room, but we shall see.
***Safety Notice- Please add furniture safety straps to avoid lockers from tipping over.


Gosh! I love these. I sure wish I could do neat things like this...Love those lockers!
ReplyDeleteI am so glad I came across your blog! I have been looking for DIYs like what you do.
ReplyDeleteThese are awesome. I love the wood you chose in between each crate. The detail on the front edge makes such a nice addition.
Question... the inside shelf supports were just glued? Do you plan on placing anything on the shelves? If so what kind of glue and how much weight can it bear? Bare? Bear? Lol.
And I'm curious, do the locker numbers have significance?
Thanks for sharing all your cute projects. I'm going back to binge reading your blog.
Sara
Yay, I'm so glad to have you around! Yes, the shelves are only supported with wood glue. I use DAP all purpose wood glue and it's surprisingly strong. I hesitated nailing into the crates since the slats are thin and nails would show. I don't plan on putting too much weight on the top shelves, maybe hats and gloves in a basket.
DeleteHaha, no, the numbers don't have any significance. I was going to do our birthday's, but opted to only us 2 numbers. It's probably the first time I've used numbers in my home that didn't have significance to our family :)
Thanks again for stopping by and I'm so glad you found me! xoxo
You did an amazing job with these lockers, Katie!! I don't blame your son for begging to have them in his room! The numbers are the perfect addition!
ReplyDeleteawesome job katie love evrything about them xx
ReplyDeleteSuch a cool idea, Katie! I love how these turned out!
ReplyDeleteThis is amazing! I love everything about it. I wasn't actually looking for a new DIY project when I got on Pinterest today, but I just HAVE to try this. Already thinking of where to put it and what to put in it. Thank you so much for sharing this awesome, and beautifully done, idea.
ReplyDeletenow i need to make 1 or 5 of these!! question, you said "Please add furniture safety straps to avoid lockers from tipping over"
ReplyDeletewhat are these and where would you put them on the locker?
Where do you buy doors to fit?
ReplyDeleteI actually had to measure and cut my own doors. They aren't fancy, so it really wasn't difficult.
DeleteReally amazing idea. I want to try it. Thanks for sharing.
ReplyDelete