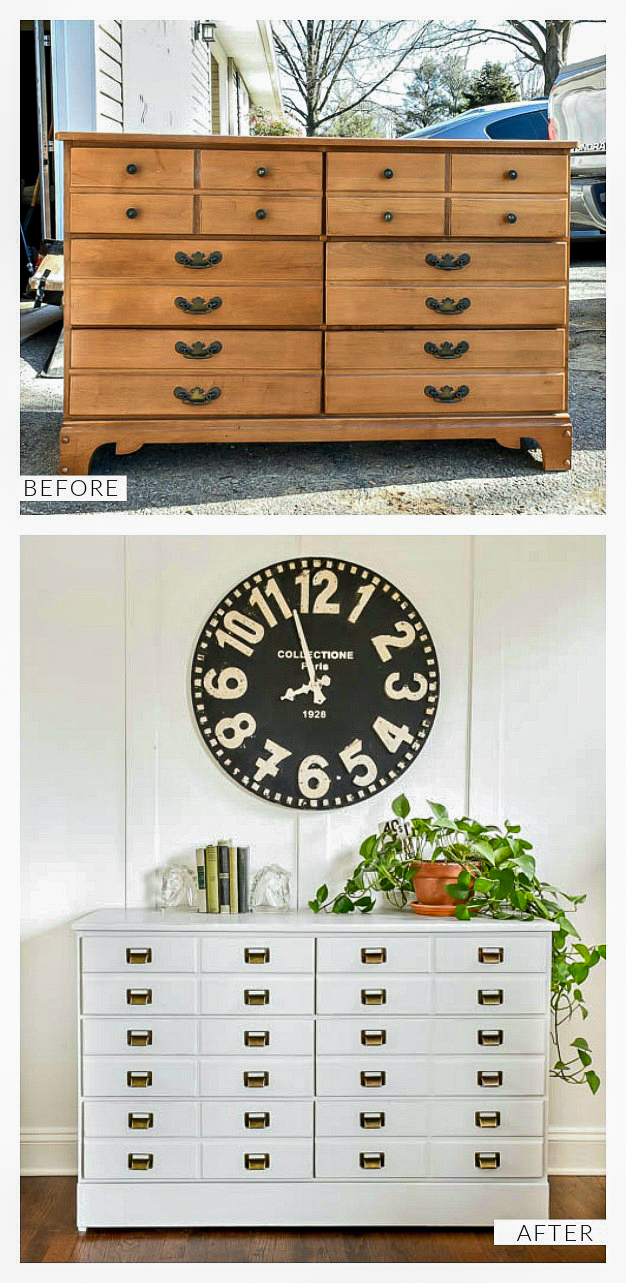
Learn how to turn a dated dresser into a vintage inspired apothecary cabinet!
Finding quality affordable used furniture has been really hard to come by lately. It's been pretty slim pickings at my go-to used furniture sources, but I was lucky enough to come across a solid wood dresser with tons of potential.
I knew right away I could turn the dated dresser into a cool vintage inspired apothecary cabinet. You know I love card catalogs and anything with multiple drawers, which made the Facebook Marketplace purchase a no-brainer.
- SUPPLIES NEEDED TO TURN A DRESSER INTO A APOTHECARY CABINET -
- 80 and 120 grit sanding pads
- Ryobi Airstrike Nailer with 1 1/2" nails
- 1' x 5' x 8' wood board
- Screwdriver
- Tape measure
- Straight edge (or piece of wood)
- Hammer
-Putty knife
-Putty knife
- Router
- Simple Green
- Paper Towels
- Cardboard
- Pencil
- Lint-free rag or wax brush
- HOW TO TURN A DRESSER INTO A APOTHECARY CABINET -
The dresser that I purchased had two drawers that were already divided to give the appearance of four drawers. In order to create an apothecary inspired cabinet, I needed to create the same look on the four remaining drawers.
I have never used a router before, but in order to learn new things, I know I need to push myself a little out of my comfort zone. The only way to grow is if you're willing to feel awkward and uncomfortable and this project definitely made me feel a little uncomfortable.
I started by lining up one of the drawers that was already routed and used it as a guide for the rest of the drawers.
I used 2 large clamps to keep the drawers lined up and measured and marked where I needed to route out the four remaining drawers. I measured the distance from the router base to the center of where I needed to make the new cuts then clamped a piece of wood to use as a guide.
I started with a 1/2" straight bit to make the first straight cut then switched to a 90 degree "V" grooving bit to angle the sides of the drawers.
The trickiest parts were making sure the bits were at the correct depth and lining up the grooving bit correctly. After I made the initial straight cuts, I had to go back and use the grooving bit on both sides of the straight cut. The most time-consuming part was switching back and forth between bits then readjusting the depths of the cut.
My cuts weren't perfect, but I was pretty proud of how my first router project turned out. I was definitely frustrated and discouraged while working on the first drawer, but quickly got the hang of it and started to feel more comfortable.
After I had all four drawers routered, I used wood putty to fill all the old hardware holes and fix any errors I made while routering.
I sanded the entire dresser using my Dewalt Orbital Sander with 80 grit then 120 grit sandpaper.
The original curved bottom dated the dresser, so I removed it and cut a piece of 1x5 to create a new base. I attached the new base with wood glue then secured the wood using my nailer.
I cleaned the dresser with Simple Green, gave it two coats of General Finishes Seagull Gray, distressed it a bit then sealed the paint with General Finishes Finishing Wax in Satin.
The thought of drilling 96 new hardware holes was a little daunting, but I created a template and it actually went pretty fast.
I stepped outside my comfort zone, tried something new and could not be happier with the end result of this dresser turned apothecary cabinet.


This is amazing. Thanks!!!
ReplyDeleteI really like the dresser. Very beautiful.
ReplyDeleteLove it!
ReplyDeleteWow - what a great idea! That turned out so great and I've ordered the pulls from Amazon! Thank you!
ReplyDeleteCute faux apothecary dresser
ReplyDeleteWowzer! Looks good, great idea!
ReplyDeleteI did a similar one but rubbed dark wax in all the grooves which turned out looking pretty authentic also, but yours is cool as well!
ReplyDeleteKatie! So amazing, as always! I'm looking for a storage piece for my craft room. Will stop passing on pieces like this. Thank you!
ReplyDeleteLove the color and the hardware! Keep up the good work!
ReplyDeleteCan you please give me info on the hardware absolutely stunning I’ve been trying to find the perfect hardware and haven’t had luck in ordering the correct size I’d great ❤️Your feed back
ReplyDeleteThank you! I actually linked to the exact hardware I used in the supplies list. Hopefully those work out for you!
Delete